Hydra Nemesis Wideband 02 Sensor Installation Instructions
These in structions are complete and accurate to the best of my knowledge, if you notice any incorrectness, please let me know by emailing me at techinfo@koracing.net.
Note: What you do to your car is your business, and you take full responsibility for your own actions. KO Racing, Inc. and Kris Osheim cannot be held legally liable for any problems associated with the use of these instructions.
Introduction: The L1H1 and L2H2 sensors are 5-wire wideband sensors. These are internally heated sensors and you should not leave them in an exhaust stream unless they are connected to the Nemesis unit so that the heater is powered. Doing so will severely shorten the lifetime of the sensor. Condensed water, which is a big component of the exhaust when the engine is cold, shortens the lifetime of the sensor. To give the sensor some protection from water, turn on the ignition and allow the sensor 30-60 seconds to warm up before starting a cold engine. Avoid prolonged use of leaded fuel as it will also shorten the lifetime of the sensor. Do not drop or knock the sensor against any hard object as this will damage the sensor. Lastly, rich AFR mixtures also reduce the usable lifetime of the sensor and these cannot be avoided on a turbocharged engine (at least not without serious repercussions). For this reasons, the expected lifetime of the L1H1 or L2H2 sensor on a 3S-GTE is about 500 hours. We recommend that the wideband sensor be used only to assist in tuning and in situations when it is critical to monitor the AFR. Using the wideband at all times in a well-tuned daily driver is an expensive luxury which should be avoided.
There are various qualities of sensors sold by NTK. The most expensive are sold specifically for use in sophisticated wide band system used by professional tuners. The ones sold for OEM and generic part replacement are slower reacting and have a higher variance than the more expensive units. The sensors we provide are OEM and generic quality and thus some variance is to be expected. Do not expect the AFR reading produced by your sensor to be gospel truth. If properly calibrated, the readings will be very close near stoichiometric levels and within several tenths of the true AFR reading in the lean and rich ranges.
Installation: On the bottom right side of the MR2's trunk there is a 1/2" hole covered with a rubber stopper. Push this stopper out with a screwdriver and put the 1/2" rubber grommet supplied with the O2 sensor kit in the hole to protect the wideband wires from the sharp metal edge of the hole. From the engine side of the hole, carefully pass the five pins on the wideband cable that connect to the Nemesis harness into the trunk until they reach the Nemesis harness. You will have to pull back a portion of the plastic sheath protecting the wires and cut it and re-wrap the wires on the trunk side of the cable after you measure out precisely how much cable you need to reach the Nemesis connectors. Route the cable in the engine bay carefully so that the L1H1 connector reaches the location where the wideband will be placed without making contact with any moving or hot parts. Use zip ties if needed to keep the cable from any possibility of coming into contact with any moving or hot exhaust parts.
Make sure that the ignition power is off. Unplug the three square connectors from the Nemesis and carefully take note of them. You will first need to insert the red wire from the WBO2 cable into the D7 hole in the large blue connector. Look for the row of holes labeled D1 - D16 (on the back of the connector) and starting at D1, count carefully to the seventh hole from the right. Insert the red wire pin into this hole so that it clicks into place (there are two ways to insert the pin, only one is right and locks the pin into place). If you accidentally put this pin or any other into the wrong hole, use a straightened out paper clip inserted in the bigger square hole on the Nemesis end of the connector to carefully unlock the pin so that you can pull it out the way it went in. Now repeat this process with the remaining four wires. They all go into the gray connector. The black wire goes into pin B9 of the gray connector. The white wire goes into pin B1 of the gray connector. The green wire goes into pin B2 of the gray connector. Finally, the yellow wire goes into pin A11 of the gray connector. When the pins have been inserted, double check them and then plug the connector back into the Nemesis. The two small connectors must go into the same color plug on the Nemesis.
Reference pin for wideband cable to Nemesis:
- Red wire -- Large blue pin D7
- Black wire -- Small Grey pin B9
- White wire -- Small Grey pin B1
- Green wire -- Small Grey pin B2
- Yellow wire -- Small Grey pin A11
Further information on wire colors:
- L2H2 Blue wire -- KO Racing Cable Red wire -- Hydra Pin BD07 (Blue connector, D row, pin 7)
- L2H2 Yellow wire -- KO Racing Cable Black wire -- Hydra pin GB09 (Grey connector, B row, Pin 9)
- L2H2 Grey wire -- KO Racing Cable White wire -- Hydra pin GB01 (Grey connector, B row, Pin 1)
- L2H2 White wire -- KO Racing Cable Green Wire -- Hydra pin GB02 (Grey connector, B row, Pin 2)
- L2H2 Black wire -- KO Racing Cable Yellow Wire -- Hydra pin GA11 (Grey connector, A row, Pin 11)
NOTE: Ensure that the Nemesis is seeing 12V (+/- .2 V) on the main screen 'BATT' reading when calibrating the 'WEGO ZERO CAL' value and the 'WEGO GRAD CAL' Values.
Do not take out the sensor and plug it into the wideband cable yet. If you already have it plugged in, then unplug it. Plug the laptop into the Nemesis, turn the ignition key to on (do not start the car). Press the 'Upload from ECU' button and then the 'Upload' button to load the the Nemesis maps into the laptop. Press the 'Maps' button to go to the main map screen. Verify that the AFR reading on the main panel shows a value of 14.7. If it does not, go to the 'Sensor' panel under Settings. If the AFR value is higher than 14.7, reduce the 'WEGO ZERO CAL' value and exit back to the main panel to see the new reading. Continue this process until the AFR value reads a steady 14.7. If the AFR value is lower than 14.7, increase the 'WEGO ZERO CAL' value and exit back to the main panel to see the new reading. Continue this process until the AFR value reads a steady 14.7. Turn off the ignition and continue to the next step.
Carefully take the wideband sensor out of its bubble wrapping and connect it to the connector on the end of the cable. Do not insert it into the exhaust system. Suspend the sensor carefully so that it isn't resting on the paint of your car or put it on a flat metal plate that can get hot. Plug the laptop into the Nemesis, turn the ignition key to on (do not start the car). Press the 'Upload from ECU' button and then the 'Upload' button to load the the Nemesis maps into the laptop. Press the 'Maps' button to go to the main map screen. Give the sensor three minutes to fully warm up. The sensor should get hot--too hot to touch with your fingers. Press the 'Mode' button on the main screen to switch to the numeric readout of the AFR value.
Note: Depending on what version of Nemesis you have, the calibration value for the wideband sensor will differ, though the method of adjustment is the same. Fore 2.1* units and the 2.5 units, this value is 20.7-20.8. For 2.6 and newer units, this value is 21.5. For the newer units, substitute this value for 20.7 in the following instructions.
After three minutes, the AFR reading on the main panel should show a value of 20.7-20.8. It is normal for the AFR reading to fluctuate a little bit, as long as it is averaging around 20.7-20.8 in the reading it gives you. If this looks good, power off the system and let the sensor cool until you can handle it. If the sensor reads a value different from this, go to the 'Sensor' panel under Settings. If the AFR value is higher than 20.7, reduce the 'WEGO GRAD CAL' value and exit back to the main panel to see the new reading. Continue this process until the AFR value reads a steady 20.7. If the AFR value is lower than 20.7, increase the 'WEGO GRAD CAL' value and exit back to the main panel to see the new reading. Continue this process until the AFR value reads a steady 20.7.
Unplug the wideband sensor from the connector. If you are going to place the sensor in the stock Toyota bung, screw the adapter plate provided onto the sensor and then bolt it on using the stock studs and nuts. Be sure to use the stock gasket or the one provided to prevent exhaust leaks. If you have a universal O2 bung on your downpipe, carefully dab a little bit of anti-seize on the threads of the sensor (don't get any on the tip of the sensor when you do so) and screw it in and tighten it with a 22mm open end wrench. Reconnect the sensor to the cable after you tighten it down. Make sure that neither the connector nor any of the wires can make contact with any hot exhaust part.
The recommended setup for the wideband O2 sensor is to use it in conjunction with a stock O2 sensor. The stock narrowband sensor is very good at detecting the precise point of stoichiometry (14.68:1 AFR for gasoline) while a wideband makes it easy to tune the car for making safe power. The base map provided with the Nemesis is set up to use the narrowband O2 sensor to control closed loop operating during idle and cruising.

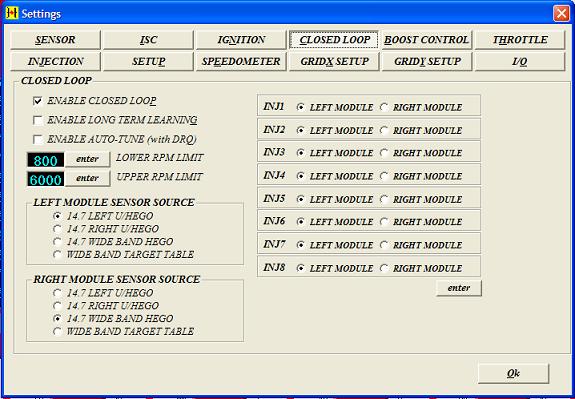
In order to use the wideband to control closed loop or perform autotuning, you will need to go to the "Closed Loop" panel under Settings and switch left module sensor source to the "14.7 Wide Band HEGO" setting to use the wideband to control closed loop or "Wide Band Target Table" to adjust to the AFR defined in the wide band target table. The wide band target table provided with the base maps is safe for most setups. Do not alter this target table unless you know exactly what you are doing. Do not attempt to use the autotuning or wide band closed loop option unless you have verified that the wideband AFR readings are properly calibrated. MR Controls is not responsible for any damage that you cause to your engine though the use of the wideband or the autotune option. Neither the wideband nor the autotune option are a suitable replacement for a qualified, experienced human tuner. They are merely tools that, if properly used, can speed up the tuning process and enhance the safety of your setup.
NOTE: You must have ordered your Nemesis with Autotuning as a feature in order to utilize this option.
To perform autotuning, enable closed loop, switch the left module sensor source to "Wide Band Target Table" and select the "ENABLE AUTO-TUNE (with DRQ)" checkbox. After doing so, drive the car around to allow the autotune function to compare the actual AFR produced by the fuel map against the AFR target table. The autotune will make adjustments to the fuel map in the Nemesis' memory. You will not see these changes on the fuel map on the laptop interface. You must not attempt to make any changes to the fuel table while autotune is being performed as this will most likely result in an error when the system notices that the laptop and the Nemesis have different values in the fuel maps. After driving around, exit to the entry screen before shutting off the engine and press the 'Upload' button to upload the autotuned map. You should view this map to make sure that the changes that were made by the autotune appear to be reasonable. Since it is difficult to hit many of the cell on the map, you may wish to compare the old map against the new and extrapolate how the changes made might indicate how cells which were not visited might be adjusted if they were. Once you are satisfied with the changes, you can make them permanent by pressing the 'Download' button. If changes are not explicitly uploaded and then downloaded, the Nemesis will forget them when the power is switched off and start with the last downloaded fuel map when it is powered up again.
There is an autotune rate map under 'Select->Control 3->Autotune Rate' which can be modified to speed up or slow down the speed at which the Nemesis applies changes to the fuel map under autotune. The larger the number, the faster the autotune changes will be made. In general, the faster the engine is reving, the faster that a change to the map is going to be reflected in the wideband sensor readings, so you do not want to have the autotune rate set too high at lower RPMs. In general, a rate between 10-60 should be good for maps that are fairly reasonable to start with. |